1.4.1 ハンズオンワークショップ:再現可能な AI 学習ラボを作る
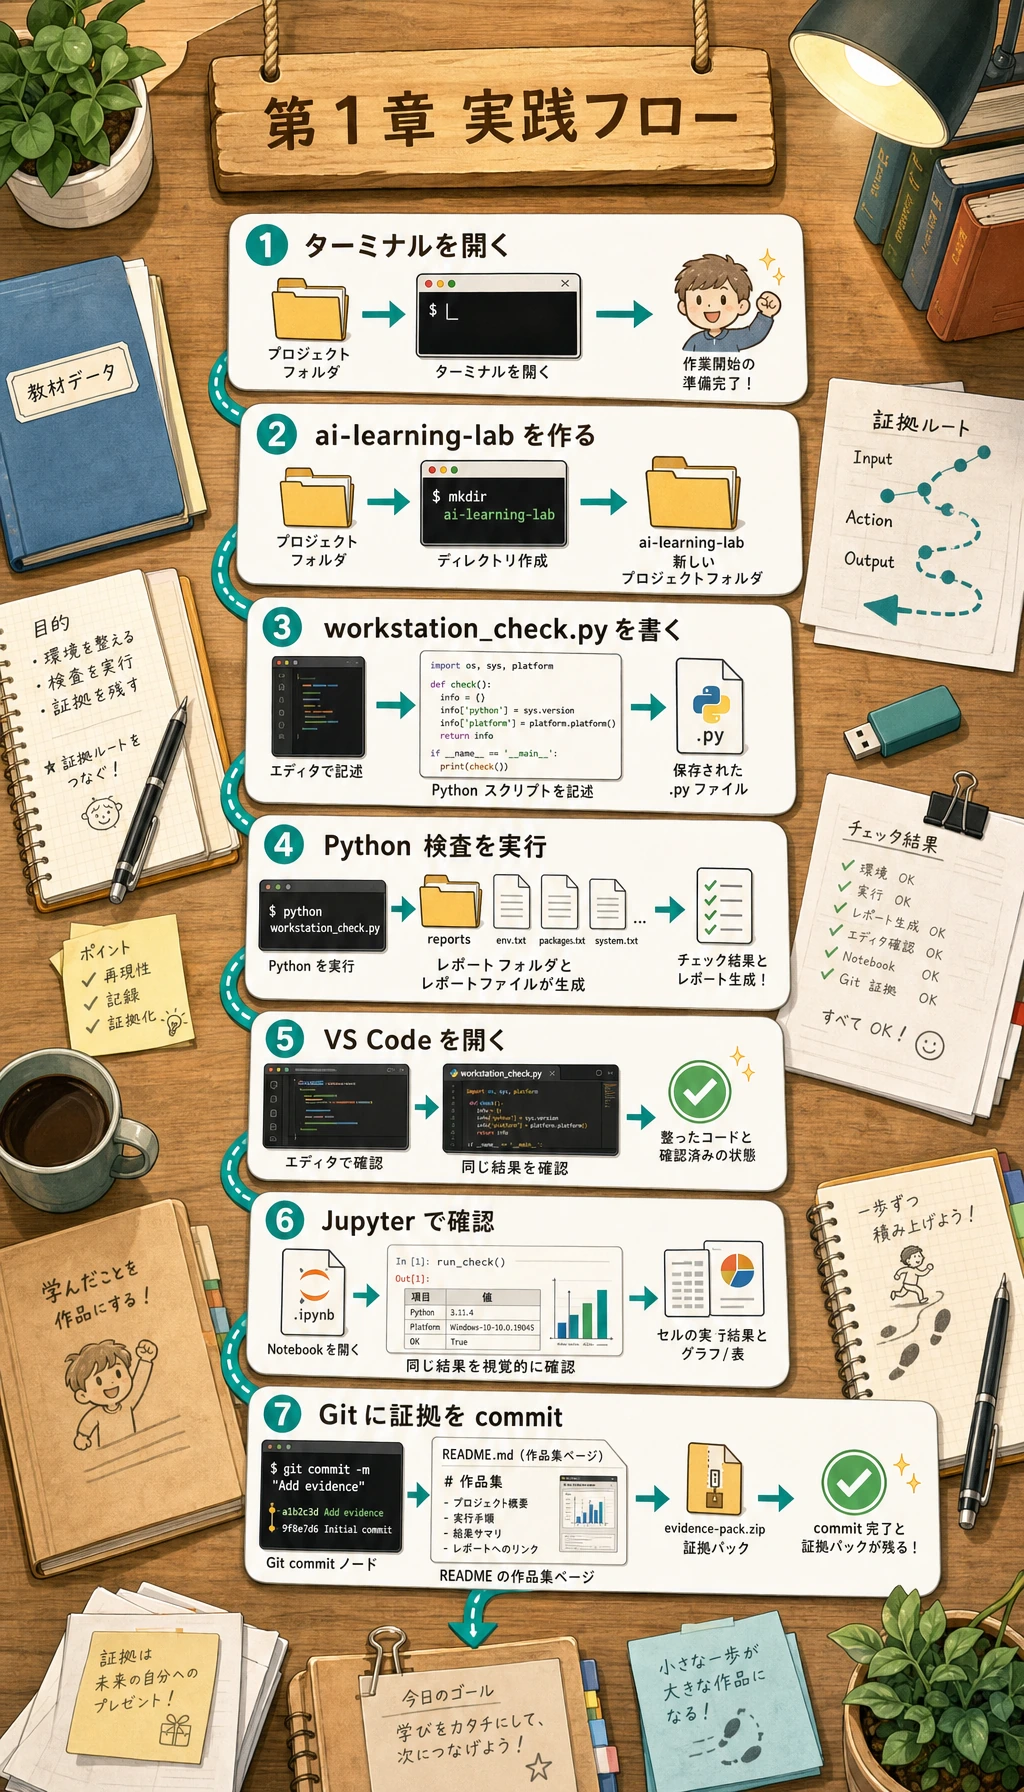
このページは第 1 章の実践ブリッジです。ai-learning-lab という小さなリポジトリを作り、Python 環境チェックを実行し、レポートを保存し、Git commit を行い、作業台が使えることを示す作品集の証拠を残します。
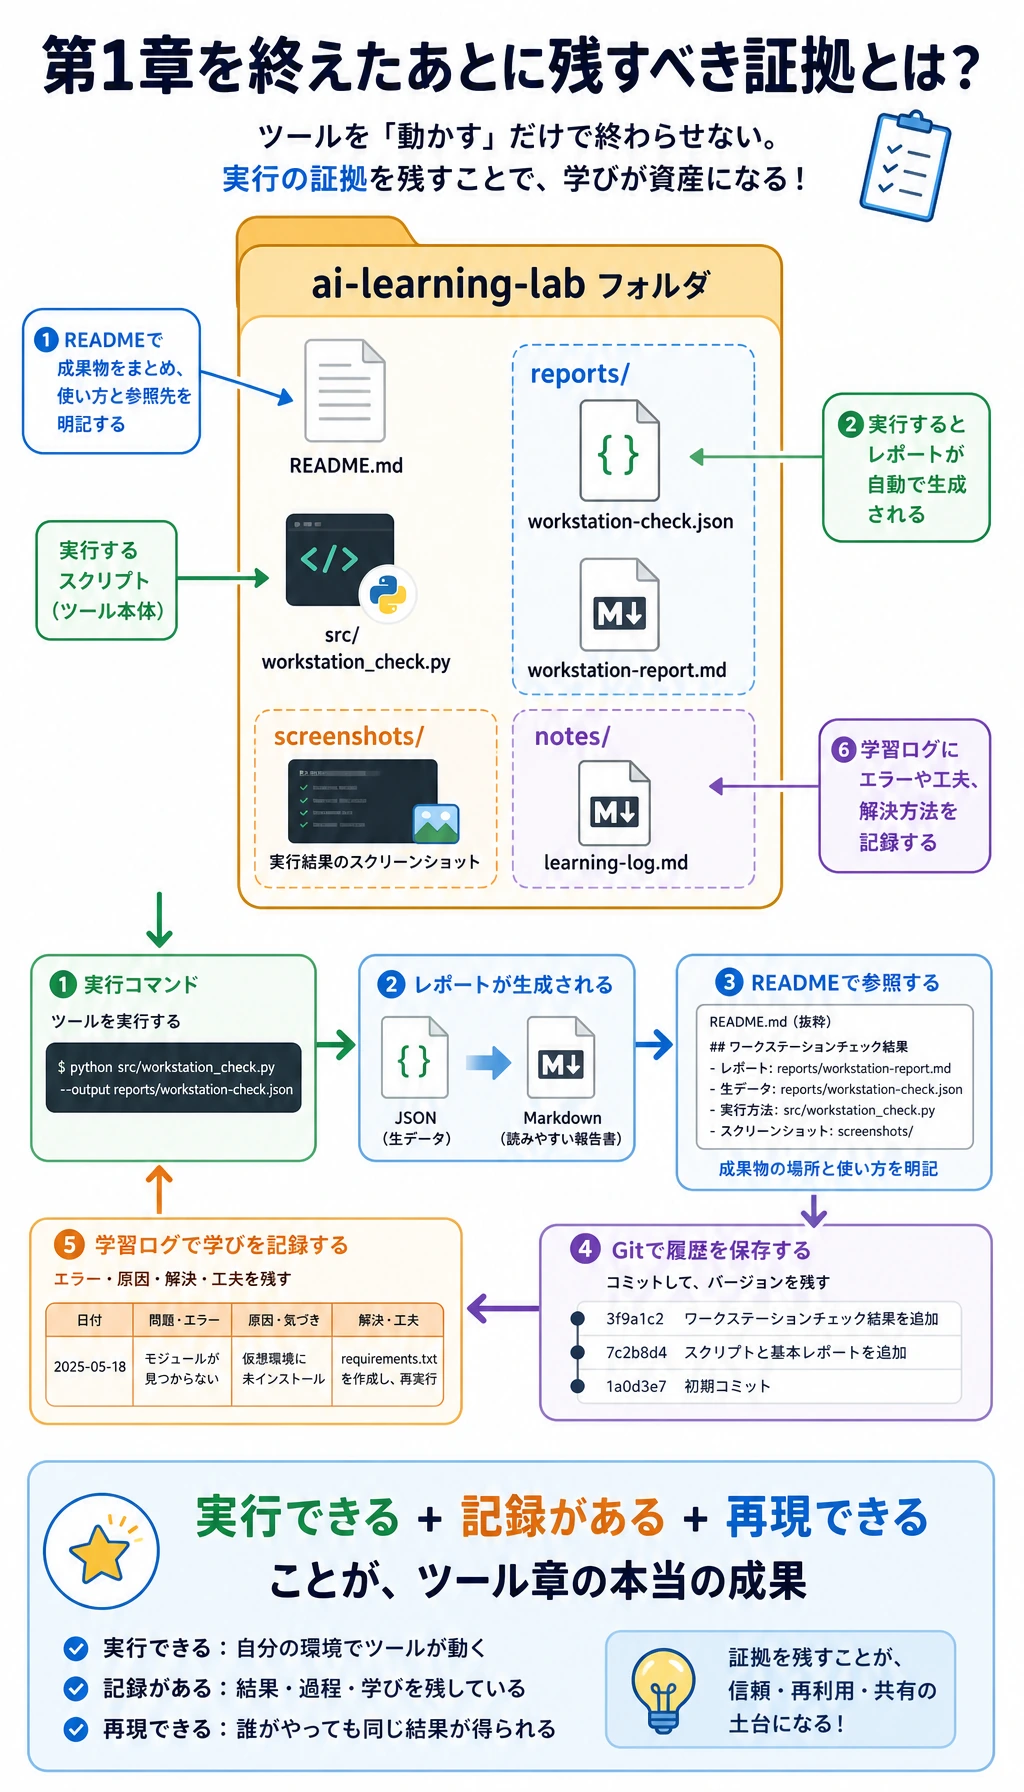
作るもの
ここでは、次の問いに答えるローカルプロジェクトを作ります。「このコンピュータで、プロジェクトを作成し、実行し、確認し、保存し、説明できるか?」
完成後のプロジェクトには、次のファイルが入ります。
| ファイルまたはフォルダ | 役割 |
|---|---|
README.md | プロジェクトの目的、実行コマンド、期待される出力を書く |
src/workstation_check.py | 現在のツールチェーンを確認する実行可能な Python スクリプト |
notes/learning-log.md | 日々のコマンド、問題、トラブルシュートを記録する |
reports/workstation-check.json | 機械が読みやすい環境レポート |
reports/workstation-report.md | 人が読みやすい作品集の証拠 |
.gitignore | キャッシュ、秘密情報、ローカル環境を commit しないための設定 |
このワークショップでは Python 標準ライブラリだけを使います。外部 SDK、クラウドアカウント、有料サービスは不要です。
Step 0:きれいな練習フォルダを作る
ターミナルを開いて実行します。
mkdir ai-learning-lab
cd ai-learning-lab
pwd
python3 --version
期待される出力は次のような形です。
/Users/zhangsan/ai-learning-lab
Python 3.12.3
パスや Python バージョンは違っていて構いません。このワークショップでは Python 3.10 以上で十分です。
PowerShell で python3 --version が認識されない場合は、python --version を使ってください。以降も同じ Python コマンドを使い続けると混乱しにくくなります。
Step 1:まず全体の流れを見る
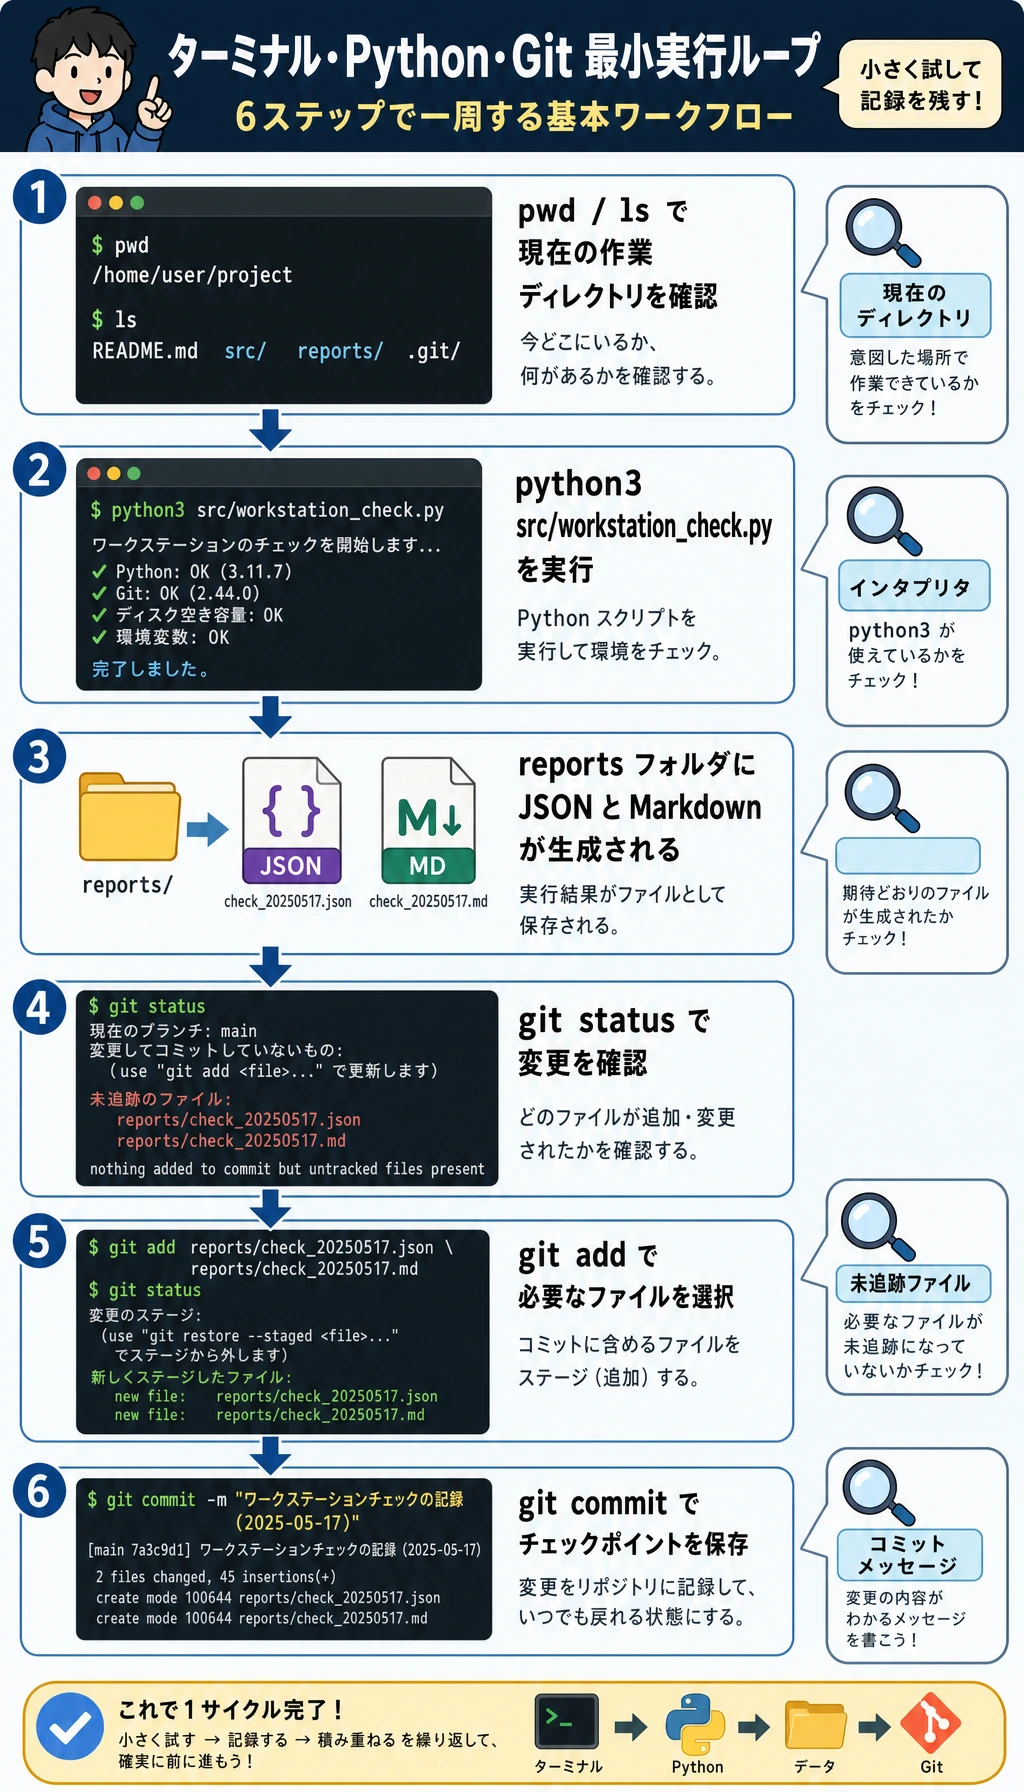
これらのツールを別々の話題として扱わないでください。実際の開発では、1 つのループになります。
| Step | ツール | すること |
|---|---|---|
| 1 | ターミナル | プロジェクトフォルダに移動し、コマンドを実行する |
| 2 | Python | チェックスクリプトを実行し、証拠を生成する |
| 3 | エディタ | ファイルを読み、改善する |
| 4 | Git | 安定した状態を commit として保存する |
| 5 | レポート | 再実行できることを示す出力を残す |
後で何かが失敗したら、多くの場合はこのどれかが切れています。現在のフォルダ、Python インタプリタ、依存関係の場所、ファイルパス、Git 状態を順番に確認しましょう。
Step 2:プロジェクト骨格を作る
ai-learning-lab の中で実行します。
mkdir -p src notes reports notebooks screenshots
touch requirements.txt
.gitignore を作ります。
cat > .gitignore << 'EOF'
__pycache__/
*.pyc
.venv/
venv/
.env
.env.local
.ipynb_checkpoints/
.DS_Store
EOF
最初の README を作ります。
cat > README.md << 'EOF'
# AI Learning Lab

This repository is my reproducible learning workspace for the AI full-stack course.

## Run

```bash
python3 src/workstation_check.py
```

## Expected output

The script prints the current project root, Python executable, Git branch, and report file paths.
EOF
最初の学習ログを作ります。
cat > notes/learning-log.md << 'EOF'
# Learning Log

| Time | Command or action | Result | Note |
|---|---|---|---|
EOF
期待される構成:
ai-learning-lab/
  README.md
  requirements.txt
  src/
  notes/
  reports/
  notebooks/
  screenshots/
tree を入れている場合は tree -a -L 2 で確認できます。入れていない場合は find . -maxdepth 2 -type f で十分です。
Step 3:実行できる環境チェックスクリプトを追加する
src/workstation_check.py を作り、次のコードを貼り付けます。
from __future__ import annotations

import json
import platform
import subprocess
import sys
from datetime import datetime, timezone
from pathlib import Path
from typing import Any

PROJECT_ROOT = Path(__file__).resolve().parents[1]
REPORTS_DIR = PROJECT_ROOT / "reports"
NOTES_DIR = PROJECT_ROOT / "notes"
JSON_REPORT = REPORTS_DIR / "workstation-check.json"
MARKDOWN_REPORT = REPORTS_DIR / "workstation-report.md"
LEARNING_LOG = NOTES_DIR / "learning-log.md"


def utc_now() -> str:
    return datetime.now(timezone.utc).replace(microsecond=0).isoformat()


def run_command(command: list[str]) -> dict[str, Any]:
    try:
        completed = subprocess.run(
            command,
            cwd=PROJECT_ROOT,
            text=True,
            capture_output=True,
            check=False,
        )
    except FileNotFoundError:
        return {
            "command": " ".join(command),
            "returncode": 127,
            "stdout": "",
            "stderr": f"{command[0]} was not found",
        }
    return {
        "command": " ".join(command),
        "returncode": completed.returncode,
        "stdout": completed.stdout.strip(),
        "stderr": completed.stderr.strip(),
    }


def visible_project_files() -> list[str]:
    files: list[str] = []
    for path in sorted(PROJECT_ROOT.rglob("*")):
        if ".git" in path.parts or path.is_dir():
            continue
        files.append(str(path.relative_to(PROJECT_ROOT)))
    return files


def ensure_workspace_files() -> None:
    REPORTS_DIR.mkdir(exist_ok=True)
    NOTES_DIR.mkdir(exist_ok=True)
    if not LEARNING_LOG.exists():
        LEARNING_LOG.write_text(
            "# Learning Log\n\n| Time | Command or action | Result | Note |\n|---|---|---|---|\n",
            encoding="utf-8",
        )


def build_report() -> dict[str, Any]:
    return {
        "generated_at": utc_now(),
        "project_root": str(PROJECT_ROOT),
        "python_version": sys.version.split()[0],
        "python_executable": sys.executable,
        "platform": platform.platform(),
        "git_branch": run_command(["git", "branch", "--show-current"]),
        "git_status": run_command(["git", "status", "--short"]),
        "project_files": visible_project_files(),
    }


def write_reports(report: dict[str, Any]) -> None:
    JSON_REPORT.write_text(json.dumps(report, ensure_ascii=False, indent=2), encoding="utf-8")

    branch = report["git_branch"]["stdout"] or "(no branch yet)"
    status = report["git_status"]["stdout"] or "working tree clean"
    lines = [
        "# Workstation Report",
        "",
        f"- Generated at: {report['generated_at']}",
        f"- Project root: `{report['project_root']}`",
        f"- Python version: `{report['python_version']}`",
        f"- Python executable: `{report['python_executable']}`",
        f"- Git branch: `{branch}`",
        "",
        "## Git status",
        "",
        "```text",
        status,
        "```",
        "",
        "## Project files",
        "",
    ]
    lines.extend(f"- `{file}`" for file in report["project_files"])
    MARKDOWN_REPORT.write_text("\n".join(lines) + "\n", encoding="utf-8")


def append_learning_log(report: dict[str, Any]) -> None:
    branch = report["git_branch"]["stdout"] or "no branch"
    LEARNING_LOG.write_text(
        LEARNING_LOG.read_text(encoding="utf-8")
        + f"| {report['generated_at']} | python3 src/workstation_check.py | ok | branch: {branch} |\n",
        encoding="utf-8",
    )


def main() -> None:
    ensure_workspace_files()
    report = build_report()
    write_reports(report)
    append_learning_log(report)

    branch = report["git_branch"]["stdout"] or "(no branch yet)"
    print(f"[ok] project root: {PROJECT_ROOT}")
    print(f"[ok] python: {report['python_version']} at {report['python_executable']}")
    print(f"[ok] git branch: {branch}")
    print(f"[ok] wrote {JSON_REPORT.relative_to(PROJECT_ROOT)}")
    print(f"[ok] wrote {MARKDOWN_REPORT.relative_to(PROJECT_ROOT)}")
    print("[next] run git status, then commit the files when the output looks right")


if __name__ == "__main__":
    main()
初心者が特に理解しておきたい点は、Path(__file__).resolve().parents[1] でプロジェクトルートを見つけていることです。つまり、プロジェクトフォルダから python3 src/workstation_check.py を実行すれば、レポートを書き込む場所を自分で判断できます。
Step 4:Git を初期化してスクリプトを実行する
次のコマンドを実行します。
git init
git branch -M main
git config user.name "AI Learner"
git config user.email "[email protected]"
python3 src/workstation_check.py
期待される出力:
[ok] project root: /Users/zhangsan/ai-learning-lab
[ok] python: 3.12.3 at /usr/local/bin/python3
[ok] git branch: main
[ok] wrote reports/workstation-check.json
[ok] wrote reports/workstation-report.md
[next] run git status, then commit the files when the output looks right
Python のパスは違っていて構いません。大事なのは、スクリプトが動き、2 つのレポートファイルが作られることです。
生成された証拠を確認します。
cat reports/workstation-report.md
git status --short
git status --short の出力は次のようになります。
?? .gitignore
?? README.md
?? notes/
?? reports/
?? requirements.txt
?? src/
?? は、Git がそのファイルを見つけているが、まだ追跡していないことを意味します。
Step 5:最初のきれいな commit を作る
git add .gitignore README.md requirements.txt src notes reports
git status --short
git commit -m "Initialize AI learning lab workstation"
git log --oneline
期待される出力:
abc1234 Initialize AI learning lab workstation
これで、自分の作業台に最初の安定したチェックポイントを保存できました。
Step 6:main を壊さずにブランチを練習する
小さなブランチを作り、学習メモを 1 つ追加し、スクリプトを再実行してから main に戻します。
git checkout -b practice/add-daily-note
printf "\n- Practiced terminal, Python, and Git together.\n" >> notes/learning-log.md
python3 src/workstation_check.py
git diff -- notes/learning-log.md
git add notes/learning-log.md reports/workstation-check.json reports/workstation-report.md
git commit -m "Add daily tool practice note"
git checkout main
git merge practice/add-daily-note
git log --oneline --graph --all
PowerShell ユーザーは、printf の行を次のように置き換えられます。
Add-Content notes/learning-log.md "- Practiced terminal, Python, and Git together."
この練習はわざと小さくしています。目的は複雑なブランチ運用を覚えることではなく、main は安定線、練習ブランチは安全な試行場所だと体感することです。
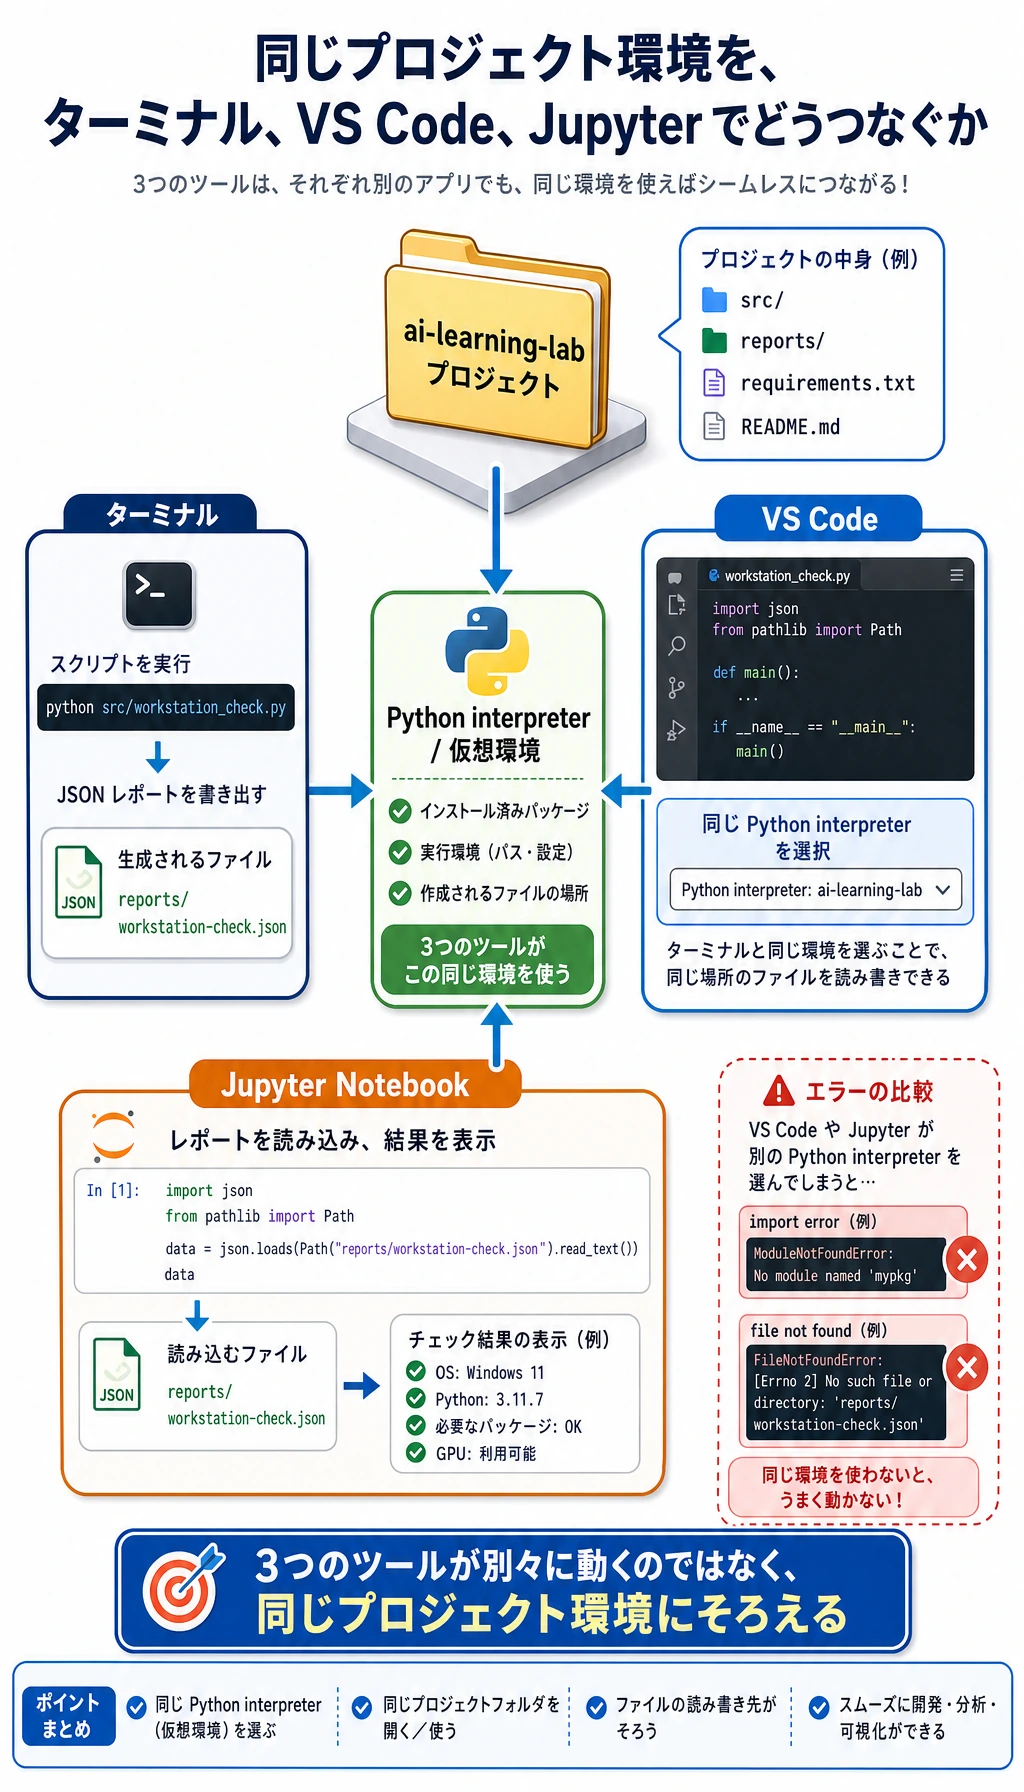
Step 7:VS Code と Jupyter を 2 つの作業パネルとして使う
VS Code でプロジェクトを開きます。
code .
次を確認します。
| 確認項目 | 見る場所 |
|---|---|
フォルダ名が ai-learning-lab | VS Code Explorer |
| 選択中のインタプリタが想定どおり | Command Palette -> Python: Select Interpreter |
| スクリプトが動く | VS Code ターミナル:python3 src/workstation_check.py |
| Git の変更が見える | Source Control パネル |
Jupyter を使う場合は、notebooks/01-workstation-review.ipynb を作り、次の Cell を実行します。
import json
from pathlib import Path

report = json.loads(Path("../reports/workstation-check.json").read_text(encoding="utf-8"))
print(report["python_version"])
print(report["git_branch"]["stdout"])
print(len(report["project_files"]))
期待される出力:
3.12.3
main
7
ファイル数は違っていて構いません。大事なのは、Notebook がスクリプトで生成した同じレポートを読めることです。これで、探索用の notebooks/ と、証拠用の reports/ がつながります。
Step 8:壊れたリンクを見つけて直す
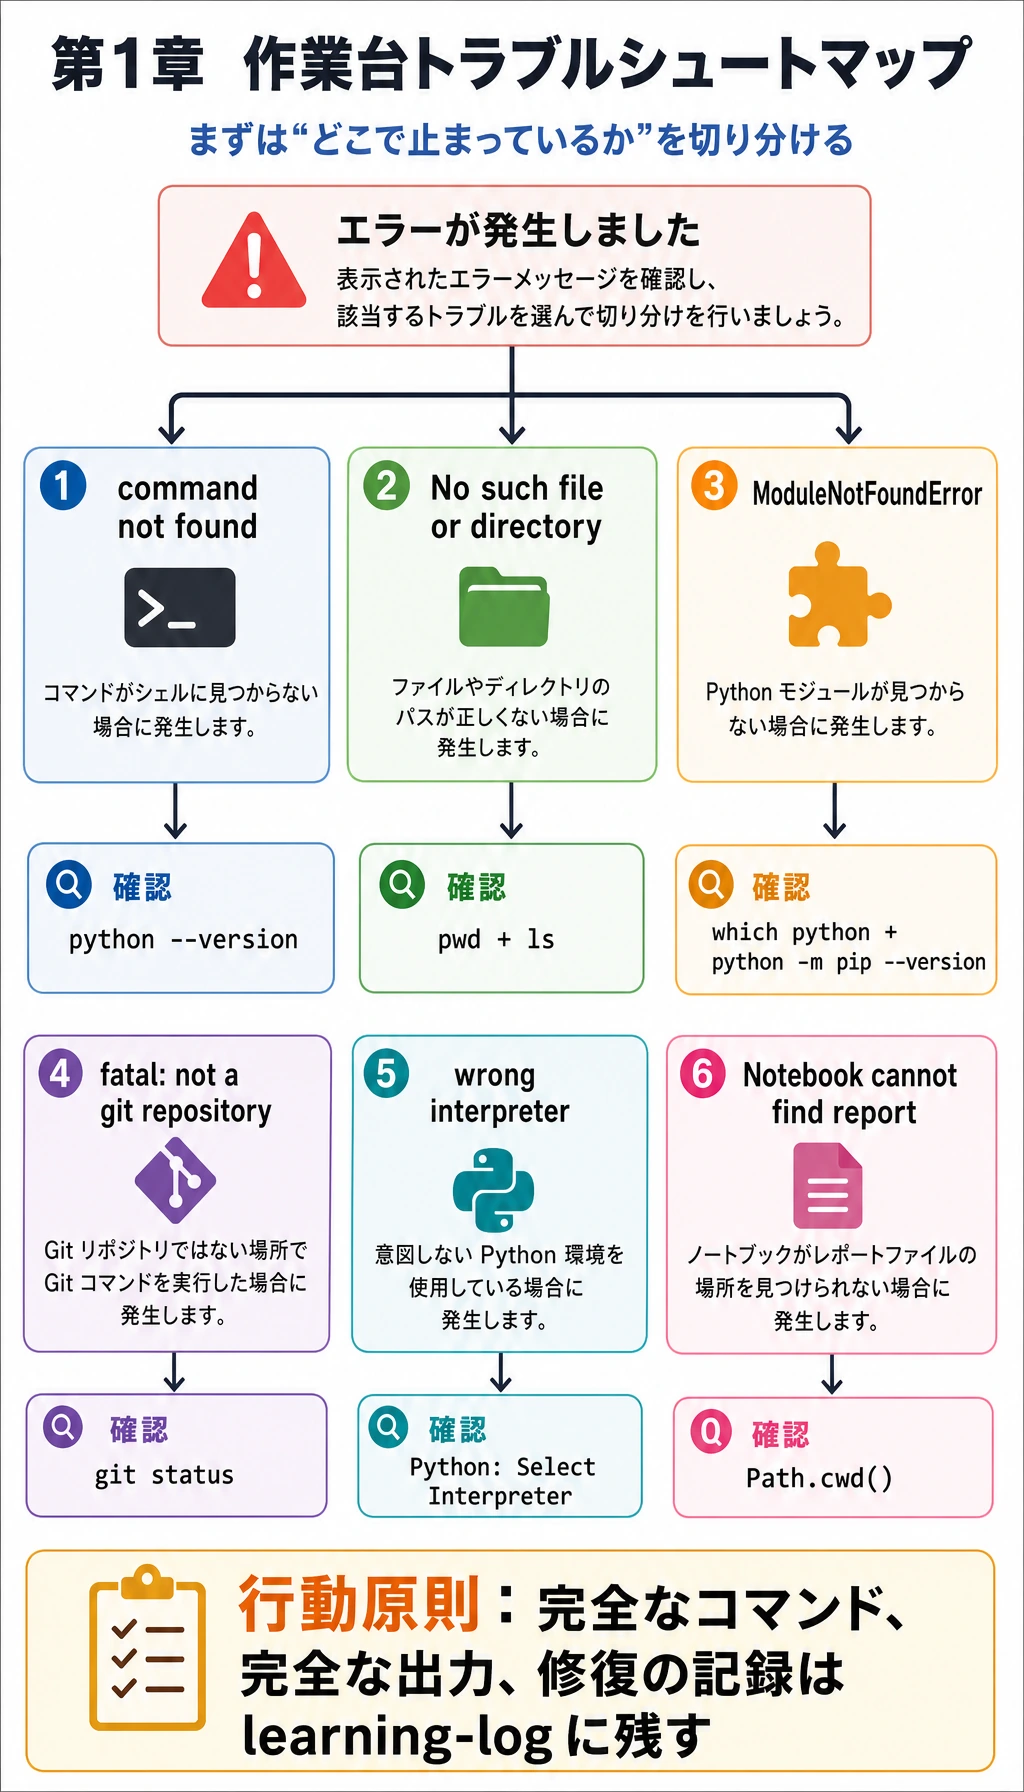
エラーが出たら、まず落ち着いて、どのリンクが切れているかを確認します。
| 症状 | 最初に実行するコマンド | よくある原因 | 修正方法 |
|---|---|---|---|
python3: command not found | python --version | システムでは python を使う設定になっている | python を使い続ける、または PATH を設定する |
No such file or directory | pwd と ls | フォルダが違う | cd で ai-learning-lab に入る |
ModuleNotFoundError | which python と python -m pip --version | パッケージを別環境に入れている | 目的の環境を有効化し、python -m pip install ... で入れる |
fatal: not a git repository | git status | リポジトリ外にいる、または git init を忘れた | プロジェクトフォルダへ移動する、または git init する |
| VS Code が別の Python を実行する | python3 -c "import sys; print(sys.executable)" | VS Code とターミナルのインタプリタが違う | Python: Select Interpreter を使う |
| Jupyter がレポートを見つけられない | Notebook Cell で Path.cwd() | Notebook の作業場所がプロジェクトルートと違う | ../reports/... を使う、または Notebook を移動する |
最後の 1 行のエラーだけをコピーしないでください。完全なコマンド、完全な出力、次に試したことを notes/learning-log.md に残します。
Step 9:作品集の証拠パックを整理する
第 1 章を終える前に、証拠パックで結果と過程の両方を見せられるようにしましょう。
| 証拠 | 最小版 | 作品集向けの強い版 |
|---|---|---|
| 実行コマンド | python3 src/workstation_check.py | README にコマンド、出力、トラブルシュートを書く |
| 環境証明 | ターミナル出力に Python バージョンがある | reports/workstation-check.json に実行ファイルと OS が記録されている |
| Git 証明 | commit が 1 つある | 意味の分かる小さな commit が複数ある |
| エディタ証明 | VS Code でプロジェクトを開ける | インタプリタを選び、実行結果も記録している |
| Notebook 証明 | 任意 | Notebook が生成レポートを読み、内容を説明している |
| デバッグ証明 | エラー記録が 1 つある | 「症状 -> 原因 -> 修正」の表がある |
ミニ練習
docs/commands.mdを追加し、この章で使った 10 個のコマンドを記録します。git commit -m "Add command practice notes"で commit します。reports/terminal-transcript.txtを追加し、成功した実行出力と、自分で直したミスを 1 つ貼り付けます。src/path_check.pyを追加し、Path.cwd()とPath(__file__).resolve()を出力します。practice/readme-updateブランチを作り、README を改善してからmainに merge します。
最終セルフチェック
- 現在のフォルダ、プロジェクトルート、Python ファイルパスの違いを説明できる。
- ターミナルと VS Code から同じスクリプトを実行できる。
-
git status --shortで Git の状態を確認できる。 - 小さなブランチを作り、commit して main に merge できる。
- 作業台でコードを実行できることを示すレポートファイルがある。
ここまで確認できれば、第 1 章は単なるツール一覧ではなく、以降のすべての章で再利用できる作業基盤になります。